This article is a user guide for Selfie Race. Click here to view this page in a web browser.
Using VIXI Capture to Gather Selfies for Racers and NPCs
1. Log Into your account on Vixi Suite https://vixi.thefamousgroup.com
2. Locate and open the drop-down menu on the left side of the screen and select Vixi Capture.

This will bring you to the following menu screen:
- Event Drop Down Menu: Select Specific Event
- Configure Event: Contains the settings for the specific event (phone graphics, event and output URLs, and QR code)
- Start Event: Activates the event
- Moderate: Moderation screen for selecting racers and extras
- Event Stats: Contains statistics for event activation
3. To create a new event, press the plus (+) icon under the event drop down menu. Enter a name in the text box, then press the disk icon to save. You can have up to a maximum of 5 events saved.

4. Once a new event is created, press the Configure Event button to enter the menu to set up the event.

5. In the Configure Event menu are the settings to configure the specific event. Also, where you can download or link to the QR code and copy the Event Key for use in the Selfie Race desktop application.
-Edit Phone Graphics: Upload graphics to be displayed on a participant's phone. Contains options for participant text inputs
-Event URL: Allows you to copy the link to the web page for direct access to the phone app
-Output URL: This is for outputting photos directly from VIXI Capture. (Will not be used for Selfie Races)
-Event QR: Allows you to download or copy the link to the participation QR code to use for fan participation
-Event Key: Allows you to copy the event key code to be used in the Selfie Race application
-Terms and Conditions File: Allows you to upload terms and conditions file for the participants
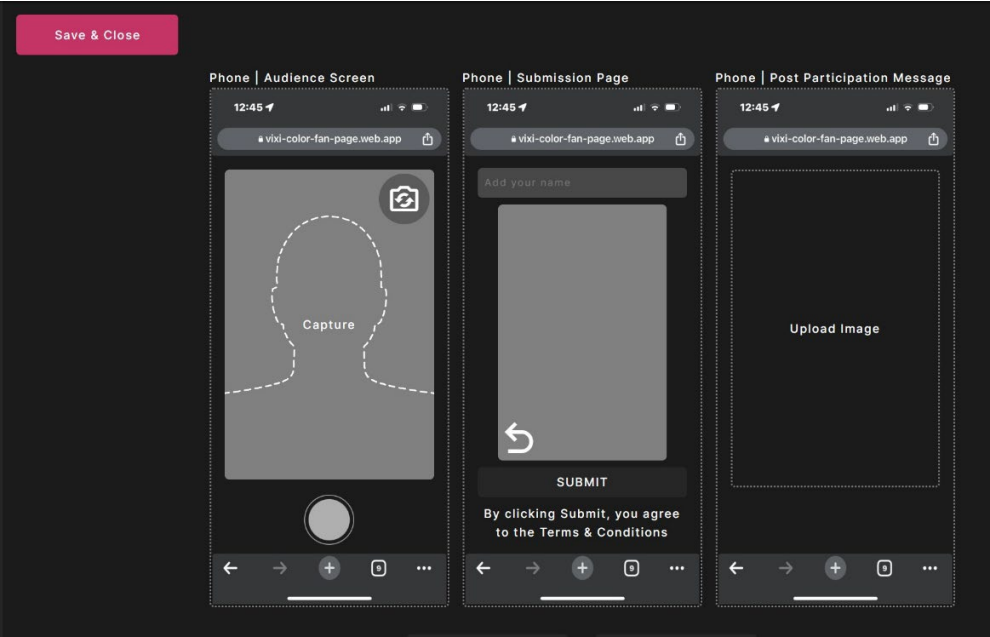
6. In the Edit Phone Graphics menu, you will find the place to upload graphics that will be seen by participants on their phones or devices, and the options for participant inputs.
Phone Audience Screen: Place to see options on the camera screen
Phone Submission Page: Place to see the options for the photo submission page
Phone Post Participation Message: Place to upload post participation graphics with messages
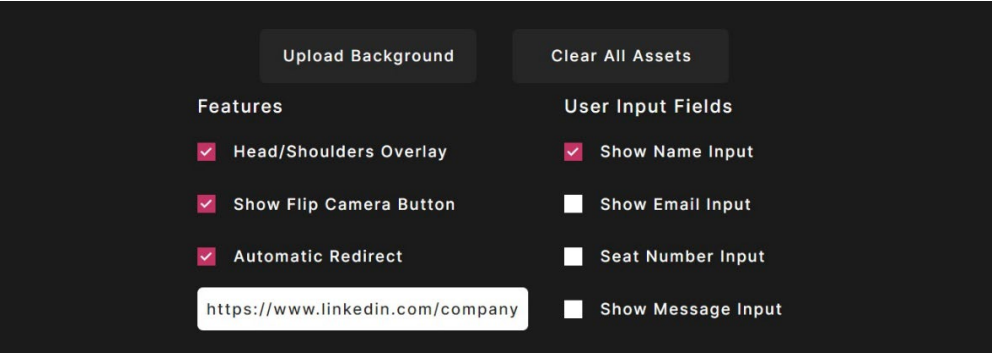
Upload Background: Upload a background phone graphic
Clear All Assets: Removes all uploaded assets
Head/Sholders Overlay: Adds participant overlay graphic. Show Flip Camera Button: Shows the flip camera button option Automatic Redirect: Can automatically redirect the user to an external website after photo submission
User Input Fields: Allows text input for the participants. Includes Name, Email, Seat Number, and Message inputs
7. Once you have configured the options for your specific event, press the Start Event button to activate the event. After the event has started and the QR code has been shown to the audience for submitting selfies, press the Moderate button to enter the moderation panel.

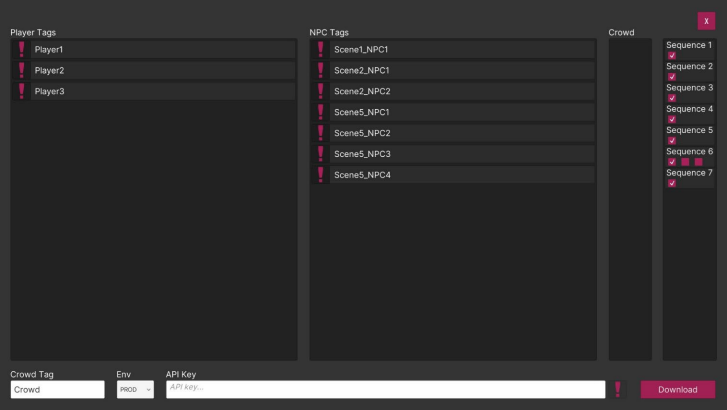
8. In the moderation panel, you will see the photos being submitted by the audience participants. You will also see options to be used for the Selfie Race. First, Press the Manage Tags button to bring up the Tags Menu.

9. Here you can add or delete tags for selecting players and NPCs for the Selfie Race. For a list of tags to use, please refer to the Selfie Race desktop application, or ask your Famous Group representative. After the tags have been entered, you can close out the Tags Menu.

10. At the bottom of each photo, you will see a Plus (+) icon. Click this to assign a tag to the selected photo. A photo can be assigned multiple tags. Players are the 3 main racers of the Selfie Race. NPCs (Non-Player Character) are extra characters in the Selfie race that are highlighted throughout the race. The Crowd are the selfies in the background that cheer on the racers.
Using the Selfie Race Desktop Application
1. Launch the Vixi Selfie Race Desktop Application.
2. Once the application has finished loading, you will arrive on the main screen. Here you will see the tags for the racers, NPCs, and the crowd. These tags are the ones used in VIXI Capture when tagging the photos.
3. On the right-side Sequence menu, you can select what scenes to play in the Selfie Race. If there is one sequence with multiple sequence options, this is where you can select which ending to play. Each sequence option is an alternative storyline.
4. Once you have tagged the submitted photos in the Moderation Panel, return to the Configure Event Menu. Copy the Event Key. Return to the Selfie Race desktop application and paste the key into the API Key entry box. Press the Download button. This will download the tagged photos from Vixi Capture into the Selfie Race Application.
5. Once you have all the photos downloaded, you will see them in the Player, NPC, and Crowd Menus. After this, press the X button in the top right corner. This will take you to the beginning of the Selfie Race. To begin the race, press the SPACE bar. This will launch the selfie race animation.
6. Once the race animation is finished, or if you need to exit the race, press the Escape button to return to the Selfie Race Main screen. Press the Escape button again to close the desktop application.
Was this article helpful?
That’s Great!
Thank you for your feedback
Sorry! We couldn't be helpful
Thank you for your feedback
Feedback sent
We appreciate your effort and will try to fix the article