This guide covers how to set up and run Shuffle Studio. Click here to open this page in a new web browser, or click here to watch the video.
Topics Covered:
- Customize Phone Design
- Customize Output Design
- Running Shuffle Studio
i. Customizing the Phone Design
The first step is to set up your Phone look. This is done in the Phone Design section. Open the Left Nav and select Phone Design. Once you're on the Phone Design page, use the dropdown menu to select Shuffle Studio. On the Shuffle Studio design page, there are three tabs in the far right column. The Onboarding tab, Game Play tab, and End Card tab. Use these options to customize your Phone Design.
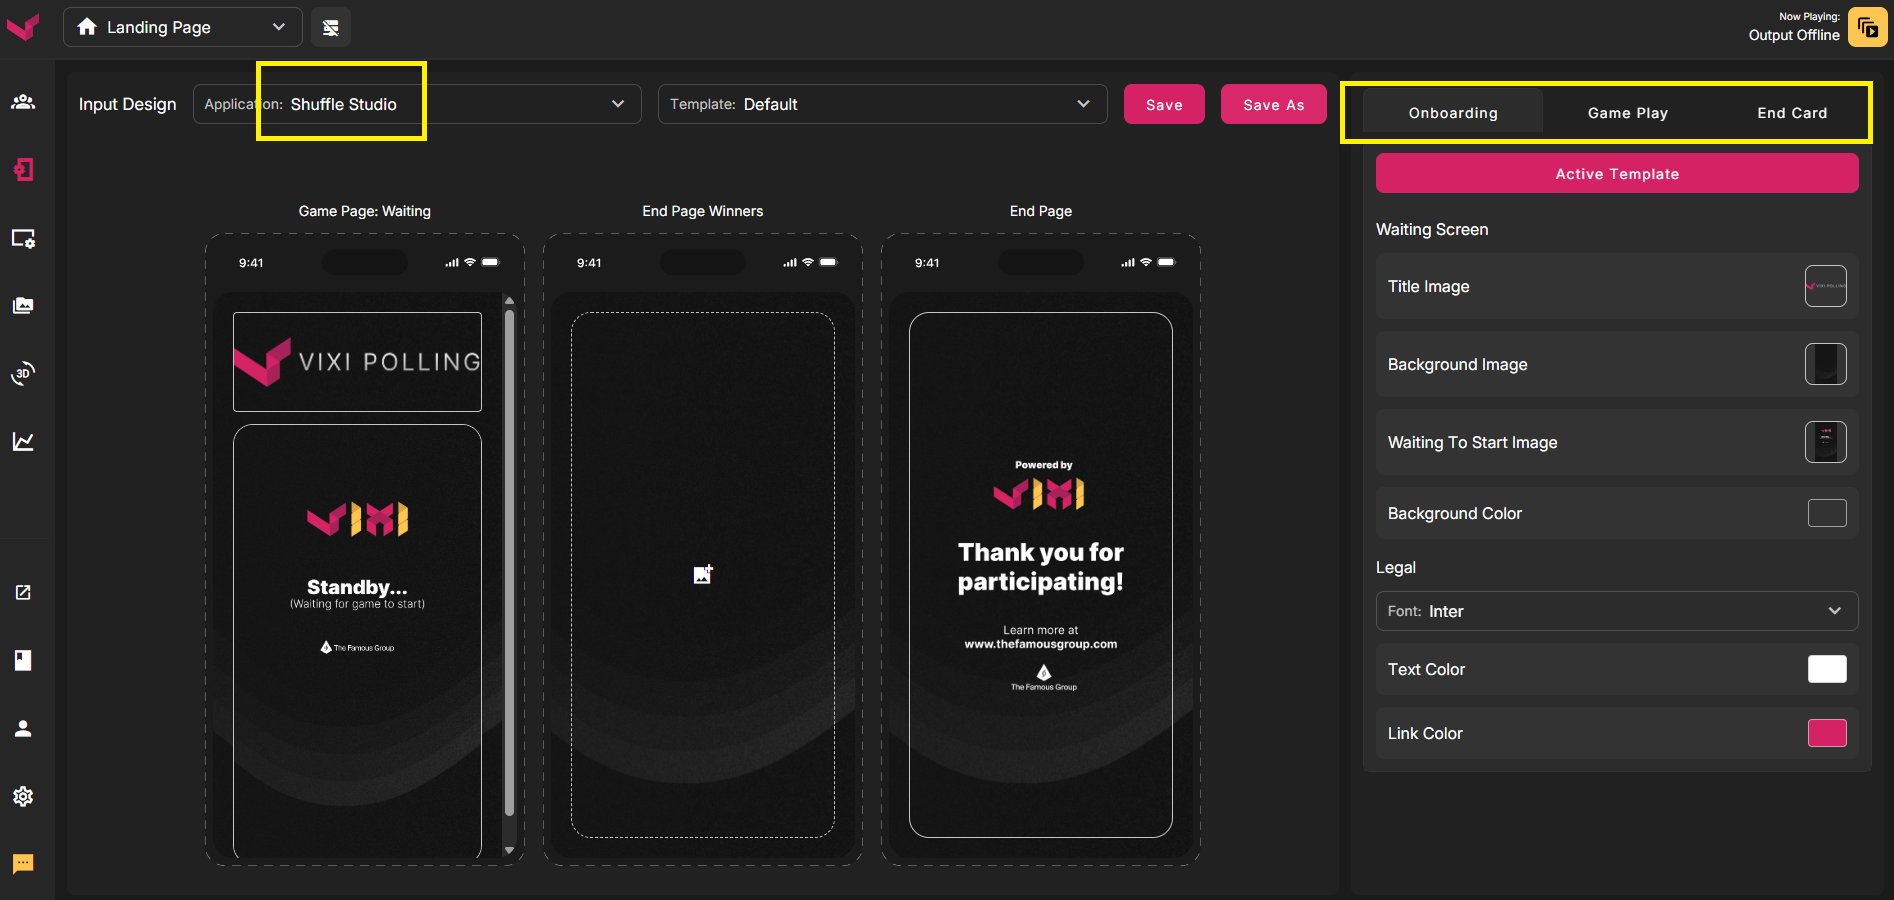
Onboarding:
Title Image
This is the small rectangular image that shows at the top of the phone screen. Max file size is 5 MB, and the recommended size is 1080w x 360h
Background Image
This is the main background for all phone screens. Max file size is 5 MB, and the recommended size is 1080w x 1920h
Waiting to Start Image
This is the screen fans will see if they scan the QR code before the shuffle animation has completed. Typically they will be watching the video board until the shuffle animation completes, at which point the phone advances to the voting screen. Max file size is 5 MB, and the recommended size is 1080w x 1920w
Background Color
This color is layered underneath the Background Image. The only reason this color would show is if there is any transparency in your background. In that case, this color would be seen in any spot with transparency
Game Play:
Font Selector
With this dropdown, you can upload custom fonts or switch between uploaded fonts. This font will used only on the Phone Screen.
Text Colors
There are 4 text options here. You can choose what color the text and background is for the voting options, and you can also choose what color it changes to once you select one of the voting choices.
Font Size
This determines the font size of the text on the phone screen.
End Card:
URL for Winners
This is the URL that winners are sent to once the game is over.
URL for all other Participants
This is the URL that non-winners are sent to once the game is over.
Auto-Redirect
With this feature enabled, fans are sent automatically to the URL once the game ends. If this feature is disabled, fans will first see a Post Participation Image once the game is over. Once the fan taps on that Post Participation Image, they will then be redirected to the URL.
Post Participation Image
If Auto-Redirect is DISABLED, you can upload an image here to send fans a message after the game ends. If a fan taps this screen, they are redirected to the appropriate URL (for winners, or losers). Max file size is 5 MB, and the recommended size is 1080w x 1920h
Background Image
This is the main background for all phone screens. Max file size is 5 MB, and the recommended size is 1080w x 1920h
Background Color
This color is layered underneath the Background Image. The only reason this color would show is if there is any transparency in your background. In that case, this color would be seen in any spot with transparency
ii. Customizing the Output Design
You can fully customize the Video Board Output using the Output Design, in the Left Nav. Once on the Output Design page, be sure to select Shuffle Studio in the dropdown at the top. On this page, you'll see many familiar design options, and a few that are specific to Shuffle Studio:
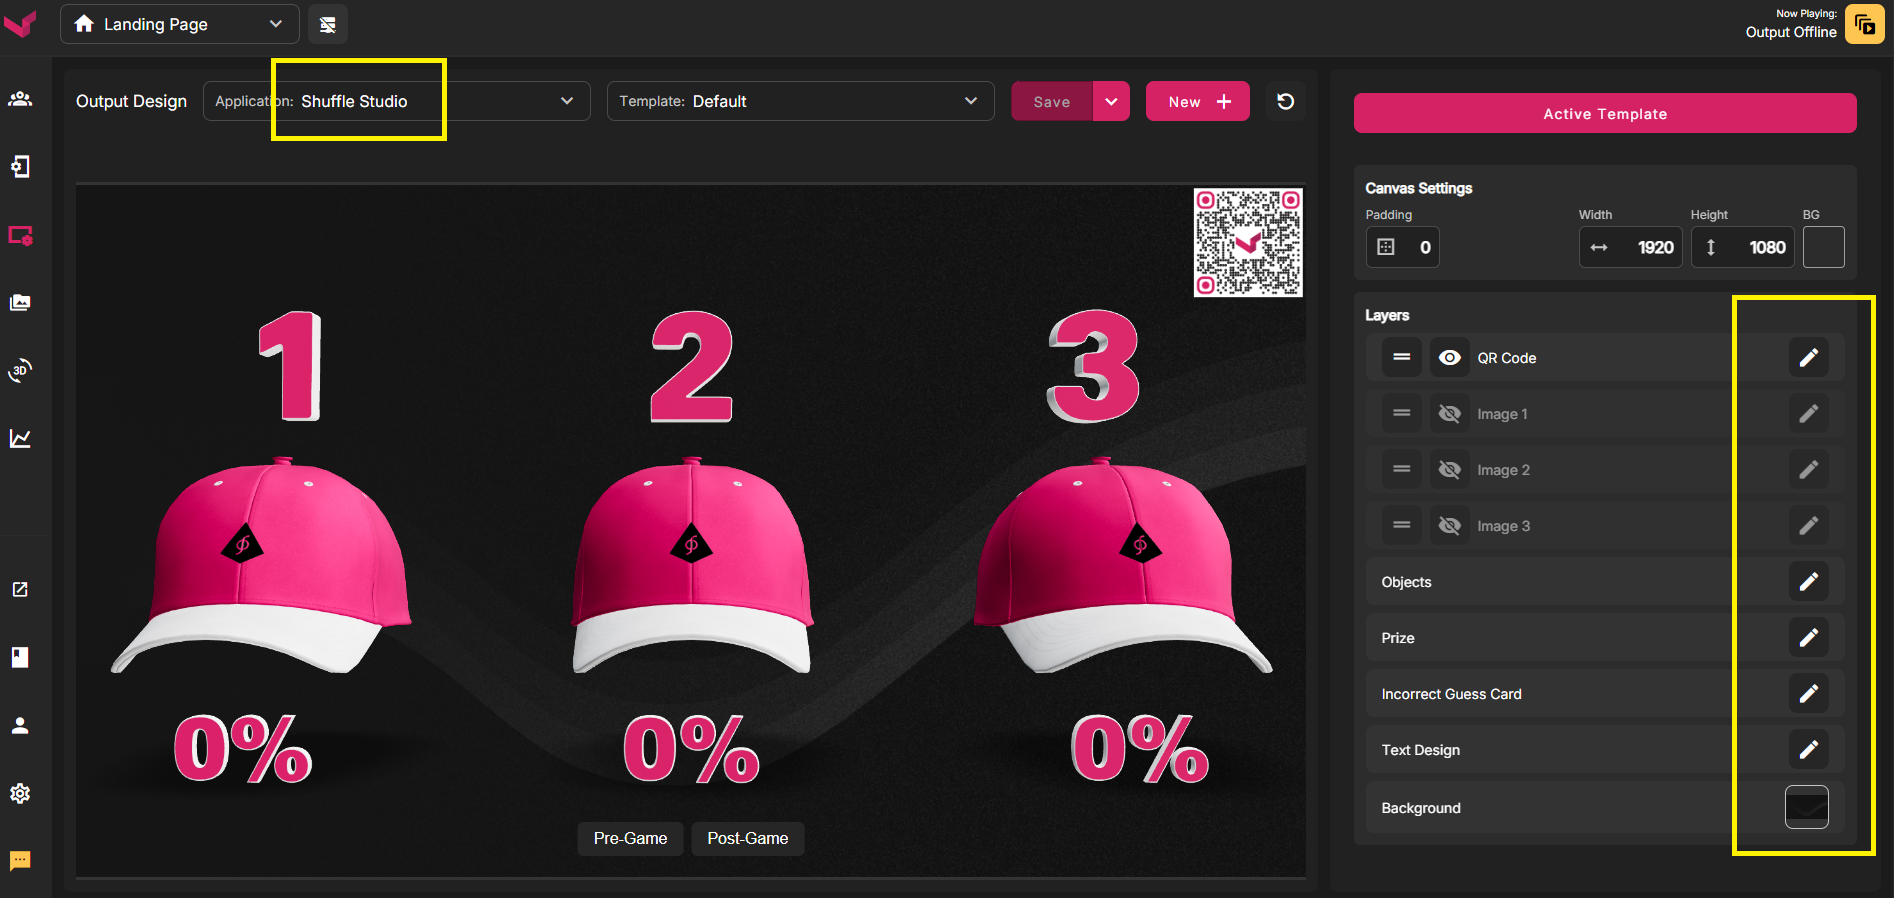
Canvas Settings
This allows you to modify the entire layout by adding Padding around the edge of the screen, or adjusting the Resolution if your Video Board isn't 1920 x 1080
Layers / QR Code
This is where you can choose to display or hide your QR code on the output. Click the eye button to hide it, and click the pencil to edit it's styling and colors
Layers / Image 1-3
You can add additional images if you desire. Up to 3 additional images can be added in this manner. If you wish to display more than 3 images, you can consider incorporating those images directly into your Background Image. By combining smaller logos with your larger background (in an editor), you can add as many logos as you like.
Objects
The "Object" refers to the 3 items that are shuffled around. This can be a hat, helmet, or cup. You can select an Object in the dropdown, and then customize it's colors. You can also upload an image to be used as the Object's logo. The scale of the objects can also be adjusted here. Use the preview to find the perfect size.
Prize
Similar to the Object. This is the item that's hidden and shuffled around. It can be a ball, or a custom image. If you choose a ball, you're able to upload a logo that gets used on the ball. If you instead choose "2:3 Texture", this simulates a sports card. Whatever image you upload is used as the Prize itself.
Example: If you choose a helmet, the uploaded image is added to the helmet. If you choose 2:3 Texture, the uploaded image IS the prize.
Incorrect Guess Card
By default, lifting a non-winning object produces a red X graphic to show that the choice was incorrect. If you upload a new image here, that image will be used in place of the red X.
Text Design
This is where you can upload and switch between fonts. You can also choose text color here.
Background
This is the main Video Board background. Use a 3-dimensional image for best results.
iii. Running Shuffle Studio
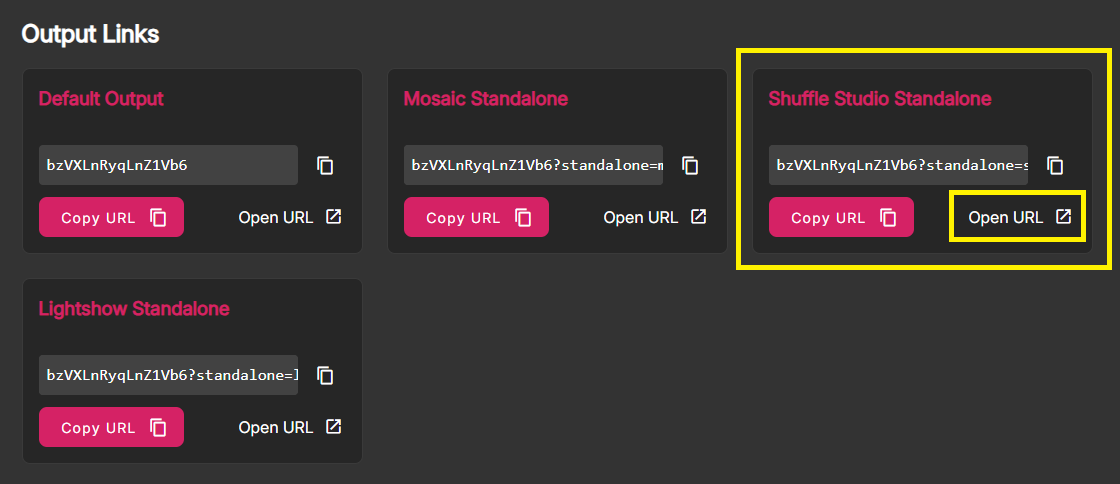
When you're ready to run Shuffle Studio, select Shuffle Studio in the header dropdown. You should also open the output on another monitor. In the Left Nav, select Input/Output Links. On that menu, select "Open URL" for the Shuffle Studio Standalone.
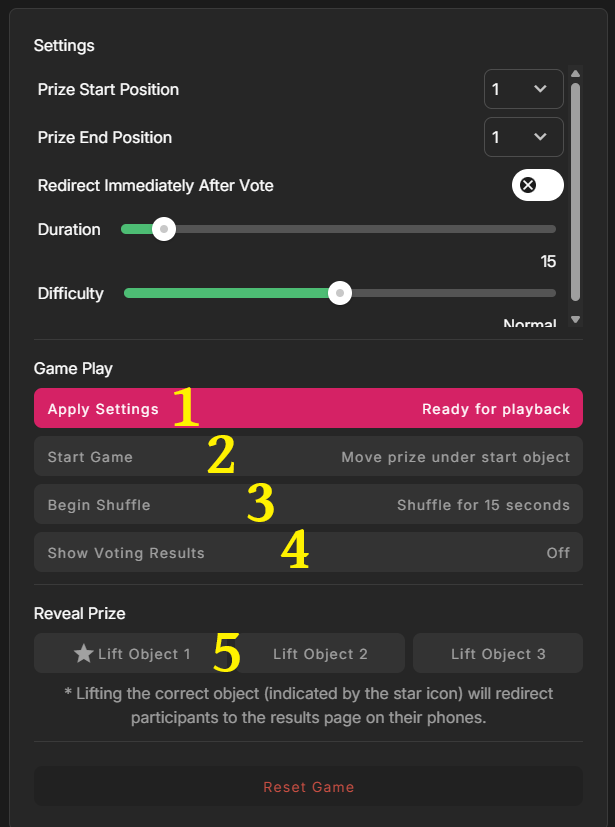
Before you begin the game, there 2 settings that you should change every time you run Shuffle Studio:
Prize Start Position
This is where the prize object begins. It has no bearing on the final outcome, but it makes the beginning "look different" from the previous game.
Prize End Position
This determines the winning position of the prize. You should change this number before most games to keep people guessing.
There are 2 more settings, but these can stay the same once you've dialed in your preference:
Duration
This is how long the shuffle animation lasts. Increase this time to increase the challenge.
Difficulty
This determines how fast the shuffle animation plays. With a higher difficulty, the objects move much faster and use more difficult alignments during the shuffle.
Begin the Game:
1) Once you have the 4 settings above chosen, click the button "Apply Settings". This locks your settings in and gets the system in stand-by mode. From here, you're ready to go live on the video board
2) When you're ready to begin the animations, click "Start Game". This plays the first animation that lasts a few seconds
3) Once that animation completes, click "Begin Shuffle". This plays the shuffle animation for your chosen duration. When the shuffle animation completes, fan voting begins. Anyone who scanned in prior to this point goes from the "Waiting to Start" page to the Voting Page.
4) You'll want to find the perfect amount of time to allow fans to vote; you don't want to advance without allowing lots of voting. Once you feel sufficient time has passed, you can begin the reveal process. First you can click "Show Voting Results" to show how everyone voted.
5) The next step is to begin revealing what is under each object. Use the three buttons labeled "Life Object" to expose any of the 3 positions. Typically you could expose the losing position that got the most votes by clicking "Lift Object" for that position.
Next you'd typically reveal the winner by clicking the "Lift Object" button with the Star. Once the winner is revealed, the game is over and fans begin going through the Post-Participation flow.
Once you are no longer broadcasting to the video board, you can click Reset Game to reset it back to a new game. You can use this button any time during setup or gameplay to start over.
Was this article helpful?
That’s Great!
Thank you for your feedback
Sorry! We couldn't be helpful
Thank you for your feedback
Feedback sent
We appreciate your effort and will try to fix the article